TriSonic™ Imaging is a patented method of
creating stereo sound with several
clear improvements over traditional approaches. It eliminates
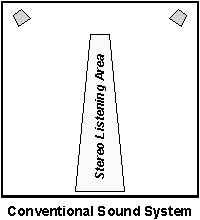
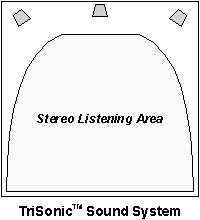
the need for a listener to stand in a small "sweet spot"
equidistant from the left and right loudspeakers. With TriSonic Imaging,
a symmetrical stereo image is clearly
heard from almost anywhere in the listening area. A comparison is shown
below. Loudspeakers can even be placed across the long side
of a rectangular room with excellent results.
Also, when compared to conventional
two-channel systems, a TriSonic system provides much better focus
and clarity across the front-line stereo soundstage.
Three loudspeakers are used
across the front-left, center, and right-to reproduce stereo signals.
It is fully compatible with all existing audio and soundtrack
formats, including CD, tape, video, broadcast, or live program,
and requires no special recording or encoding process to operate.
The four-direction playback imaging typically used in movie soundtracks
is achieved with outstanding results because no direction-steering
is needed.
This system utilizes an adjustable
electronic matrix circuit which achieves twice the separation
of conventional systems in its output channels. The MTI-3 TriSonic
Imager includes the matrix circuit and is combined with appropriate
loudspeaker placement and loudspeaker-dispersion characteristics
to provide TriSonic Imaging.
The low-bass level is
not affected by the image process. Signals from 80 Hz to 20 kHz
are imaged to the three loudspeakers according to the way they
are recorded. Imaging (source-direction-sensing) is
considered not to be perceivable by humans below 80 Hz, and this
frequency range is slightly narrowed for consistent tonal balance.
Surround outputs, which correctly
reproduce ambient or surround information from any recording,
are also included on the MTI-3. This high-fidelity ambience extraction
accurately reproduces the program source.
Monophonic sources are also
improved by TriSonic Imaging and the MTI-3. Normally, mono sounds
are clearly repro-duced at the center loudspeaker. However the
MTI-3 also includes a SpreadSound™ function that spreads monophonic sources into a big, stereo-like
soundstage. This unique spatial process maintains total clarity
and uncolored sound.
Where It Works
There are many applications
that can benefit from the use of TriSonic Imaging. All stereo
audio systems which utilize loudspeakers will be greatly improved
with TriSonic Imaging. Many systems which would traditionally
be monophonic can now be radically improved, at very modest cost,
using TriSonic Imaging. Here are some examples:
Auditoriums and Performing
Arts Centers: TriSonic
Imaging brings quality stereo sound to everyone at concerts and
other performances. Live mixes can be panned out for wide stereo,
without the coverage limitations of discrete left-center-right
systems, and with results far superior to conventional two-channel
stereo-comb-filtering problems and hot spots are gone. Practically
all of a venue's seats will receive excellent, balanced stereo
sound.
Houses of Worship:
TriSonic imaging provides improved vocal intelligibility while
creating a much larger listening area receiving optimum, full-range
sound. When recorded stereo music is played, the entire congregation
hears true stereo sound; when one is speaking through a microphone,
the clarity, focus, and intelligibility are dramatically improved.
This system is well-suited for all types of audio productions
and works well in difficult acoustic environments.
Nightclubs:
Dance music with both dynamic and spatial impact is much
more satisfying. True stereo sound is distributed over the entire
dance floor and the entire audience area. The music is more impressive
for a given SPL, and sound is distributed evenly without hot or
dead spots. Even with a loud, gut-thumping beat, patrons and employees
will find it more practical to interact.
Museum and Park Exhibits:
Multimedia exhibits and entertainment shows should accommodate
a group of people with true stereo audio. The way to achieve this
is with TriSonic Imaging. Everyone, including those who are off
to the sides, will be able to experience the benefits of quality
stereo sound with correct soundstaging.
Foreground Music Systems:
With TriSonic Imaging, music is clear but not overpowering. This
is a perfect applica-tion-for motivating, for selling...even at
an unobtrusive level, people will be touched by a sense of presence
of the music.
Touring Systems:
TriSonic Imaging benefits both large and small touring systems.
The vast majority of the audience will hear excellent stereo localization.
And those who are very close to a particular loudspeaker will
still hear the entire mix, with sounds panned to the opposite
side still clearly audible.
Portable Systems:
TriSonic Imaging enhances the per-formance of small portable systems,
increasing the coverage area and providing a bigger sound. The
low cost and small size bring a very practical improvement to
the overall performance of any portable or temporary audio setup.
Recording Studio Monitoring:
Stereo recordings can be optimally engineered with the increased
clarity provided by TriSonic Imaging. Also, the increased listening
area in the studio control room will be greatly appreciated by
all those who need to "listen in" during the mixdown
process. The MTI-3 has additional applications in recording and
production, described in Application Note #4.
Television and Radio Production:
Control and production rooms at broadcast facilities often present
a difficult en-vironment for accurate stereo monitoring of source
material. TriSonic Imaging solves this by increasing the stereo
listening area so several people in the control room can simultaneously
hear the audio with correct stereo perspective. Also, any technical
problems with the audio, such as loss of stereo or phase problems,
will immediately be audible and obvious.
Home Theater Systems:
TriSonic Imaging is ideal for home theater systems. Any stereo
TV broadcast or videotape will provide outstanding results, superior
to steered surround decoders, since TriSonic Imaging can simultaneously
image any and all directions without steering or dynamic modifica-tion.
It is a truly phenomenal improvement in home video! Compatible
with all program sources, the entire audio setup can also be used
for superior music-only playback.
Home Stereo Systems: Using
a TriSonic Imaging system is the very best way to listen to CD's,
tapes, broadcasts, or other program sources. You will be surprised
at the amount of previously-covered detail you will hear in your
favorite music. It is not necessary to sit in the center of the
room to hear good stereo. Furniture does not dictate poor audio
imaging, nor does good imaging dictate a compromised furniture
setup. This allows both excellent stereo imaging and creative,
pleasing interior design!
Schools:
Typical uses are in auditoriums, gymnasiums, and music rooms.
Even if the room has poor acoustics such as a gym, or the audience
is very spread out such as in a music rehearsal room, a TriSonic
system will greatly improve the sound. With all sources, live
or recorded, there will be more clarity and detail. This higher
standard of sound quality can be achieved very cost-effectively
with TriSonic Imaging.
Making It Perfect
Most rooms are designed for
factors other than the sound system, resulting in some compromise
of audio performance. The perfect room with the very best loudspeakers
in the truly optimum arrangement is uncommon. In practice, systems
are often set up in live rooms, with an unmatched center loudspeaker,
and with loudspeaker placement dictated by architecture or convenience.
Even so, there are variables which can be adjusted to optimize
a TriSonic system for surprisingly good results, even in the worst
conditions.
The primary factors which affect
imaging performance are
1. Room Acoustics
2. Loudspeaker Selection
3. Loudspeaker Placement
4. Loudspeaker Aiming
5. Loudspeaker Level Balance
6. External Signal Processing
7. Program Channel Balance
8. Signal-source Quality
Room Acoustics
Generally, for the best audio
imaging, the fewer the room reflections, the better. Live rooms
are notorious for preventing clear soundstaging, while dead rooms
yield a good, tight sound closely representing the original recording.
Outdoor systems typically provide excellent results, unless there
is a hard wall interfering or creating a slap echo.
There are some trade-offs in
room design. An acoustically-live room requires less power for
a given sound level and a live room tends to cover aberrations
in loudspeaker performance, making them less noticeable. These
attributes are at the expense of clear, sharp soundstaging.
A good compromise is to use
a live-end/dead-end room treatment. In this case the area at the
front of the room, behind and around the loudspeakers, is made
as dead as possible. Using carpeting or acoustic tiles on the
walls, floor, and ceiling at the front provides a good wave front
with minimal interference from reflections. The back portion of
the room, treated with relatively hard but irregular surfaces
(for diffusion), provides acoustic energy reflection for a "present"
sound quality and increased loudness.
Often the room is a "given";
its reverberation and reflection characteristics are pre-determined
by the architecture or other factors. In this case, the other
things listed below can be done to optimize the resulting sound.
Loudspeaker Selection
The loudspeakers, of course,
should be high-quality systems with adequate power handling, bandwidth,
and smoothness for good sound. Beyond that, there are mainly two
factors which affect stereo imaging: matching and directivity.
If the loudspeakers do not
match at all, they can still provide three-point imaging in a
TriSonic system. But the smoothest, clearest sound results when
there is good matching of frequency and phase response. This allows
the adjacent loudspeakers (left and center, or center and right)
to create effective phantom-image source locations between them.
Therefore it is best if the
three loudspeakers are identical. In many cases, the center loudspeaker
must be different. This can work very well as described later
in this document.
Loudspeaker directivity is
another important factor to consider. As with any sound system
design, it is desirable for the loudspeakers to provide smooth,
wideband sound to every listener they cover. Meanwhile for maximum
intelligibility and system accuracy, it is best to minimize the
energy radiated away from the listeners, toward walls or any other
reflective surface. Careful control of radiation patterns is very
helpful.
Loudspeaker Placement
For full soundstage width,
it is best if every listener can hear all three front loudspeaker
systems. In most cases this can be achieved to a satisfactory
degree.
There are two important factors
to consider with loudspeaker placement. One is the actual location
of each loudspeaker as observed by the listener. This affects
the shape of the perceived soundstage. The other factor is the
distance from each loudspeaker to the listener. This affects the
time alignment, which is important for quality sound reproduction.
TriSonic Imaging is actually
very tolerant of imperfect arrangements. However, the best approach
is to optimize the physical arrangement, from the point of view
of the listeners, and to understand the ramifications of the resulting
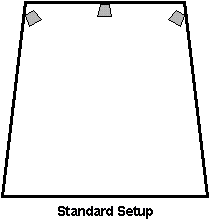
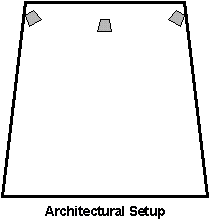
time alignment. The standard setup shown below is a good arrangement for maximum
effective soundstage width covering the whole audience. The architectural
setup shows another practical arrangement, often demanded by the architecture,
which slightly narrows the soundstage but is very effective given
the stage and seating-area design.
Loudspeaker Aiming
The loudspeakers should be
aimed basically toward the center of the audience. In larger rooms,
further adjustment toward the opposite end of the audience area--up
and across the room--will be helpful to increase coverage. Aiming
the loudspeaker axes this way provides higher acoustic radiation
toward the listeners who are more distant from the loudspeaker,
which is very helpful to increase the number of people hearing
excellent stereo sound staging.
This same principle is typically
employed when a loudspeaker cluster is designed to cover a specific
audience area using different direct radiators and/or horns. This
further improves coverage and TriSonic performance. Keep in mind
that each cluster--left, center, and right--should individually
cover the whole audience. That would be perfection; even if such
coverage is impossible to achieve, the system will still work
very effectively with TriSonic Imaging. The nature of TriSonic
is that listeners not in the optimum coverage area still hear
a great mix!
Loudspeaker Level Balance
The level balance of left,
right, and center loudspeakers is important for best TriSonic
Imaging. This is a simple yet important adjustment. One only
needs to listen, and adjust the power amplifier gain controls,
for the best resulting sound.
The Setup switch on the MTI-3
provides a simple way to achieve this. All one needs to do is
press Setup, turn the balance to left, and walk the audience area
with any music source playing. Listen to the resulting sound and
decide whether it is exactly halfway between the left and center
loudspeakers. If not, adjust the left amplifier gain to move the
left-center phantom image to the correct midpoint. Move the Balance
control to the right, and repeat for the right-center phantom
location.
When the system correctly reproduces
left-center and right-center phantom locations, it will reproduce
all soundstage locations perfectly. Just be sure to listen
from a range of locations near the center of the listening area.
This listening approach results in outstanding stereo performance.
External Signal Processing
If a crossover is used for
a mono subwoofer system, then the crossover can be patched ahead
of the MTI-3. This allows the use of a stereo two-way crossover
and is a good choice where the discrete center and surround inputs
are not used.
For higher crossover frequencies,
or where the discrete inputs are used, three crossovers are needed
at the MTI-3 outputs. To the extent possible, the three crossover/speaker
groups should be adjusted for matching sonic results.
The use of other types of line-level
signal processing, such as compression, equalization, or noise
reduction, should fol-low the same approach used for multi-stack
systems.
Overall processing which relates
to the program signal (such as SPL limiting, or program equalization)
should be in the stereo signal ahead of the MTI-3.
Direction-specific room equalization,
protective limiting, or any processing related to the individual
loudspeakers or loudspeaker stacks should be applied to the TriSonic
outputs after the MTI-3 to affect the corresponding
individual loudspeaker.
Program Channel Balance
It is important for the program
source to have correct channel balance. Modern program sources
usually do, but when the signal goes through various equipment,
the levels may be altered. As with all stereo systems, an imbalance
of even 1 dB in level may alter the perceived stereo sound-source
placement. Therefore, for best imaging from various sources, it
is a good idea to carefully adjust the balance from recorded sources
for correct centering of the stereo image. Once the balance is
set, no further adjustment should be necessary.
Signal-source Quality
As one might expect, the technical
signal quality of the program source affects its ability to provide
good stereo imaging. Poor quality sources have random phase errors
between the channels which degrades stereo localization. Live
mixes, compact discs, VHS-HiFi, and 8mm video tape are excellent
sources for stereo imaging. FM broadcast and stereo television
are also excellent in most cases.